Tab Fields
In the detailed view on the tab fields, the user-defined fields can be edited according to the read and write permissions and classified accordingly using the checkboxes.
The custom fields can also be edited during the call in the live call view, see Live View of the Conversation.

The post-processing time and the read and write permissions for the custom fields are set up in the user configuration, see Tab Fields.
When the post-editing time has expired, recordings can no longer be edited or removed from the area To Do. The recordings continue to be displayed in the area To Do.
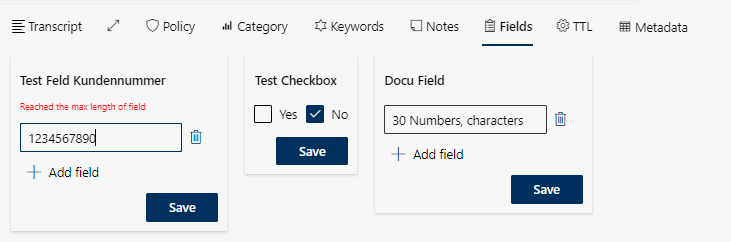
The view of custom fields and checkboxes.
Example Description with read and write access
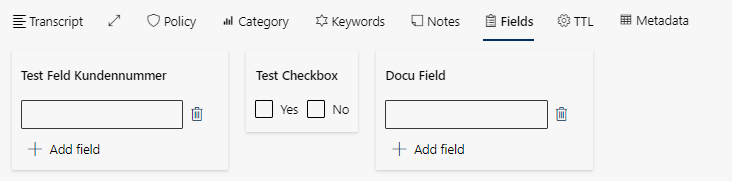
Customfields with read access
The fields are only displayed.
Custom fields with read and write access
Change the custom fields and the checkbox in the example shown above.
Specifications and description of custom fields and check boxes
Specifications for custom fields and check boxes
- Field Test Feld Kundennummer
- Only numbers, exactly 10 numbers
- Maximum of 2 fields Test Feld Kundennummer
- Check box Test Checkbox
- Trigger action: Set TTL to change the retention time
- − Yes - TTL: creation day + 500 days
− No - TTL: creation day + 90 days - Field Docu Field
- Max. 30 numbers and characters
- Maximum of 3 fields Docu Field
- In the field Test Feld Kundennummer, enter the customer number.
- Once the 10 numbers have been entered, the button Save is activated.
− If more than the permitted 10 numbers are entered, an error message is issued.
− If fewer than the permitted 10 numbers are entered, saving the entries in the field Test Feld Kundennummer is not possible. - Click on
 Add field to add another Test Feld Kundennummer.
− If more than the permitted fields are added, an error message is issued. - Click on the icon
 to delete the field Test Feld Kundennummer.
- Under Test Checkbox, tick the check box Yes or No to change the retention time.
- The button Save is activated.
If Yes is saved, changing the selection to No is no longer possible.
If No is saved, changing the selection to Yes remains possible.
- Enter text into the field Docu Field.
- Enter a minimum of 1 character so that the button Save is activated.
− If more than the permitted 30 numbers and characters are entered, an error message is issued. - Click on Add field to add another Docu Field.
− If more than the permitted fields are added, an error message is issued. - Click on the icon to delete the field Docu Field.
- Click on one of the buttons Save to save the entries.
