Add Policy
Create policy enables the compliance officer or compliance employee to create guidelines to analyze and categorize conversations. The policies can be configured on the basis of a wide variety of data.
- Click on the button
 Add policy.
In the screenshot Create policy, only the fixed fields are numbered.
Adjust the required settings:
Caption | Option/Function | Description |
1 | Name |
If you click Save and a policy with this name already exists, you will receive the following error message:
|
2 | Description | Entering a description is optional.
|
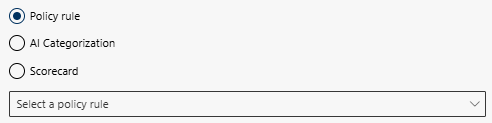
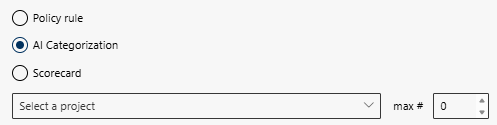
3 | Based on | Select whether the policy is created on the basis of a policy rule, AI categorization, a scorecard or an AI Assistant question.
|
Policy rule | Dynamic overlay on activation of: Policy rule. | |
Select policy rule |
Select a policy rule from the drop-down list. Only created policy rules are available for selection, see Tab Policy Rules. | |
Policy Workflow |
Select a folder from the drop-down list. | |
Action |
Enter an action description. | |
Risk rating |
Activate the corresponding check box for risk rating.
| |
Visible to |
Specify for which user(s) or group(s) the policy should be visible. To add a user or a group, see the instructions in the bottom row of the table.
| |
AI Categorization | Dynamic overlay when activating: AI categorization. | |
Select a project and max # |
Select a project: Select a project from the drop-down list. max#: Specify the maximum number of categories to be checked. | |
Policy Workflow |
Select a folder from the drop-down list. | |
Action |
Enter an action description. | |
AI language answer |
Select a language from the drop-down list in which the system should output the AI response. | |
Risk rating |
Activate the corresponding check box for risk rating.
| |
Scorecard | Dynamic display when activating: Scorecard. | |
Select a scorecard |
Select a scorecard from the drop-down list, see Tab Quality Management | |
Select conversation type |
Select the desired conversation type to define what type of recordings are evaluated, see Conversation Type.
| |
AI language answer |
Select a language from the drop-down list in which the system should output the AI response. | |
Monitored by
|
Specify which user(s) or group(s) may change the policy. To add a user or a group, see the instructions in the bottom row of the table. | |
Visible to |
Specify for which user(s) or group(s) the policy should be visible. To add a user or a group, see the instructions in the bottom row of the table. | |
Alarm Configuration |
The alarm configuration sends you notifications by email. You define the conditions under which the notification is to be sent. Configure an alarm that notifies you by email when a certain condition occurs. Alarm Configuration only appears when certain Scorecard is selected.
| |
AI Assistant | Dynamic display when activating: AI Assistant. | |
Select question |
Select a AI Assistant question from the drop-down list, see Tab AI Assistant. | |
AI language answer |
Select the language in which the AI Assistant question is answered.
| |
4 | Channel | Specify the type of conversation: chat, voice or screenshare. Multiple choice ist possible. |
5 | Assigned to | Define for which users or groups the policy applies. To add a user or group, see the instructions in the bottom row of the table. |
6 | Active | To apply the policy to all future conversations, activate the check box.
In tile view of the tab Policies, policies can be activated or deactivated directly by clicking on the button |
Select user or group | Description of the input fields Assigned user, responsible and visible to.
Every user must have been assigned an additional compliance license. |


 Information
  Attention
  Warning


 =
= =
=  =
=  =
=  =
= 


 or
or  respectively.
- Click on the button Save to save the settings.
- Click on the button Cancel to discard the settings.