Edit Policy
Edit policy allows you to adapt existing policies to ensure that the analysis and categorization of conversations always meet current requirements. You can use this function to make changes to the policy rule. This includes adding and updating criteria or customizing policy settings.
Set display mode
Display mode | Switches the display of the policies. You can select tile view (default) or list view.
|
 List view
 Tile view
Policy Edit in the Tile view
| Policy options at | Drop-down list Actions is opened. The following policy options can be selected:
|

 Delete policy, see
 Policy Edit in the list view.
| Policy options in menu bar | Click on a policy to select it. The following policy options can be selected:
|
 Add policy, see
  Policy Edit
- Select the policy for editing.
- Click on the button Policy Edit.
- The following window is displayed (example):
Adjust the required settings:
Caption | Option/Function | Description |
1 | Version | The version indicates the number of changes made for the created policy. By activating the policy, the version count is started. By selecting an earlier version, an already created policy version can be restored.
|
2 | Name | Changing the name is optional.
If you click the button save and a scorecard with this name already exists, you will receive the following error message:
|
3 | Description | Entering a description is optional.
|
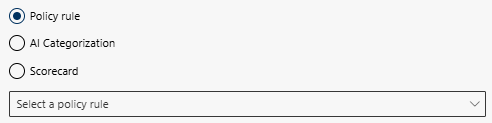
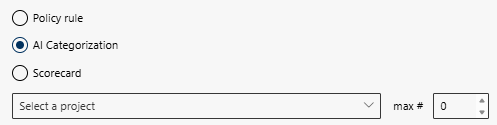
4 | Based on | Here you select whether the policy is created on the basis of a policy rule, AI categorization or a scorecard. |
Policy rule | Dynamic overlay on activation of: Policy rule. | |
Select policy rule |
Here you can change the policy rule in the drop-down list. Only created policy rules are available for selection, see Tab Policy Rules. | |
Policy Workflow |
Here you can change the folder in the drop-down list. | |
Risk rating |
Activate or change the corresponding checkbox for the risk assessment.
| |
Visible to |
Specify or change for which user(s) or group(s) the policy should be visible. To add a user or a group, see the instructions in the bottom row of the table. | |
AI Categorization | Dynamic overlay when activating: AI categorization. | |
Select a project and max # |
Select a project: Here you can change the project in the drop-down list. max#: Here you can change the maximum number of categories that are checked. | |
Policy Workflow |
Here you can change the folder in the drop-down list. | |
AI language answer |
Here you can change the language in which the system should output the AI response in the drop-down list. | |
Risk rating |
Activate or change the corresponding checkbox for the risk assessment.
| |
Scorecard | Dynamic display when activating: Scorecard. | |
Select a scorecard |
Here you can change the scorecard in the drop-down list, see Tab Quality Management. | |
Select conversation type |
Here you can change the desired conversation type to define what type of recordings are evaluated, see Conversation Type
| |
AI language answer |
Here you can change the language in which the system should output the AI response in the drop-down list. | |
Monitored by
|
Define or change which user(s) or group(s) may change the policy. To add a user or a group, see the instructions in the bottom row of the table. | |
Visible to |
Specify or change for which user(s) or group(s) the policy should be visible. To add a user or a group, see the instructions in the bottom row of the table. | |
5 | Channel | Type of conversation: chat, voice or chat and voice.
|
6 | Assigned to | Define for which users or groups the policy applies. To add a user or group, see the instructions in the bottom row of the table. |
7 | Active | To apply the policy to all future conversations, activate the check box.
In tile view of the tab Policies, policies can be activated or deactivated directly by clicking on the button |
Select user or group | Description of the input fields Assigned user, responsible and visible to.
|


 Information
  Attention
  Warning


 =
= =
=  =
=  =
=  =
= 
 Chat
Chat Language
 or
or  respectively.
- Click on the button Save to save the settings.
- Click on the button Cancel to discard the settings.